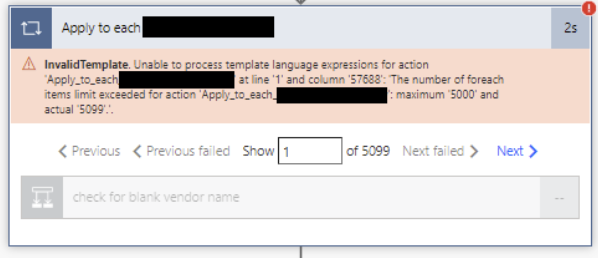
If you are using the free version of Power Automate that comes with your company Office365 account, and frequently use it to process SharePoint lists or Excel spreadsheets with a lot of rows, you may have encountered the 5,000 items looping limit error as below. This is a limit placed by Microsoft to separate free users from paid users (paid license can increase the limit from 5,000 to 100,000), and this applies to looping actions like “Apply to each”, “Do until”, etc. There are some workarounds to this if you don’t want to pay for the license and one of them is to implement batch processing.

The Concept
The basic idea of batch processing is to break a large array (all SharePoint lists and Excel spreadsheets are virtually an array with each row as one element) into several arrays of the size smaller than the 5,000 looping limit so all actions can function properly. For example, if you have an array of 6,500 elements which cannot be processed by one single “Apply to each”, you can actually break it into several batches. If we take the batch size of 2000, we will have 4 batches as elements 0 – 1999, 2000 – 3999, 4000 – 5999, 6000 – 6499 (element starts at 0 by convention of programming). Then we throw these 4 batches into “Apply to each” action which can now function as normal.
By doing the above, we are actually creating a nested loop, with the inner loop as the actual business process and the outer loop to go through all batches. Now the challenge becomes how to know the number of batches and the starting/ending point of each batch, because each time the flow may deal with arrays of different sizes.
Let’s use the above example again. The total number of batches is integer dividing total number of elements by the batch size then plus one, 6500 % 2000 + 1 = 3 + 1 = 4. This means the outer loop need to have 4 iterations. If we start the loop index from 0 (convention of programming) and increment it by 1 every time we finish one iteration, we should have 0, 1, 2, 3 and stops when it is 4. So dynamically the stop condition should be calculated as:
(loop index, starting at 0) > (total number of elements) % (batch size)Now we know the total number of iterations for the outer loop, the next challenge is to find the starting element and the ending element to be processed by the inner loop in that particular iteration. Following the convention of programming, for iteration i, the starting element for processing should be i * (batch size), and the ending element for processing should be the smaller value between (i + 1) * (batch size) – 1 and the last element of the entire array. If we use back the above example:
| Iteration i | i * (batch size) | (i + 1) * (batch size) – 1 | Last element of array | Processing range |
| 0 | 0 | 1999 | 6499 | 0 – 1999 |
| 1 | 2000 | 3999 | 6499 | 2000 – 3999 |
| 2 | 4000 | 5999 | 6499 | 4000 – 5999 |
| 3 | 6000 | 7999 | 6499 | 6000 – 6499 |
The Implementation
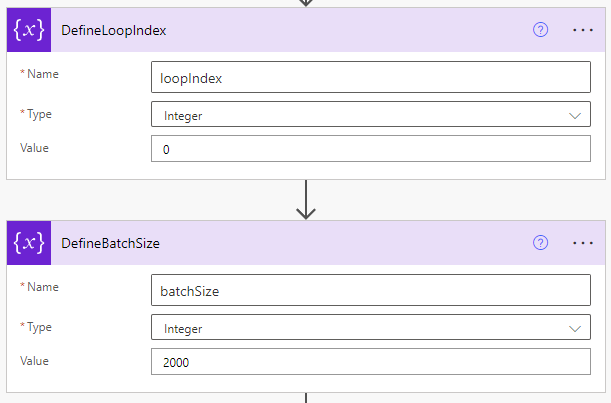
After understanding the concept, we can start the implementation. First we need to create two variables using “Initialize variable” action, namely loopIndex and batchSize, with assigned values.

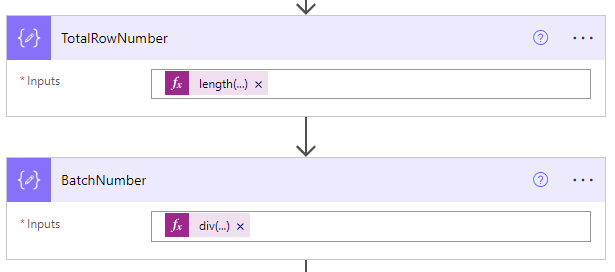
Next we need to get the total number of elements in the original array and calculate the iteration ending number, both using “Compose” action. In this demo, ‘SeparatedRows’ is an action to prepare the array, if you have an array variable ready to use, simple replace outputs(‘SeparatedRows’) with your array variable name.
length(outputs('SeparatedRows'))div(outputs('TotalRowNumber'), variables('batchSize'))
Now we know the ending number of the outer loop iterations, we can start to create the nested loop.
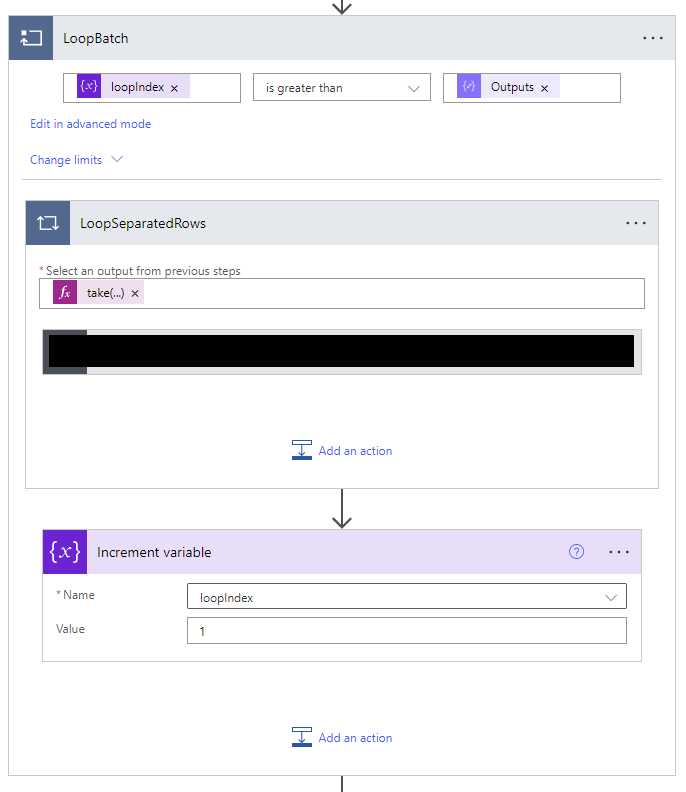
For outer loop, we use “Do until” action because it will execute one iteration first then check the condition, if not met, continue with next iteration, and if condition met, the loop will stop. This is important because there is only one iteration when the total number of elements is less than the batch size. The condition of this “Do until” should be:
variables('loopIndex') is greater than outputs('BatchNumber')Inside the outer loop, there are two action steps, one is the inner loop (the actual process to complete) and the other is the “Increment variable” action to add loopIndex by 1. For the inner loop, use an “Apply to each” action as it needs to process all elements within each batch, and set the range of the processing elements as below code. Again ‘SeparatedRows’ is an action to prepare the array in the demo, if you have an array variable ready to use, simple replace outputs(‘SeparatedRows’) with your array variable name.
take(skip(outputs('SeparatedRows'), min(add(mul(variables('loopIndex'), variables('batchSize')), 1), outputs('TotalRowNumber'))), min(max(sub(outputs('TotalRowNumber'), add(mul(variables('loopIndex'), variables('batchSize')), 1)), 0), variables('batchSize')))The nested loop should look like below. The black block part should be your actual process to be complete on each element of the array.

Above is how to implement a batch processing in Power Automate. Do test extensively with your data to make sure it works for your use case!