Author: Rik de Koning
Original Post: https://www.about365.nl/2019/08/08/view-sharepoint-item-version-history-in-powerapps/
Sometimes when you’re building a PowerApp with SharePoint as your datasource, you want your users to only use the PowerApp and not to go to SharePoint directly. In this scenario it may come in handy to provide the user with the option to view the version history as well, but how do you do that?
In this blog, I will explain how by using PowerApps in combination with SharePoint and Microsoft Flow.
Setting up your Datasource in SharePoint
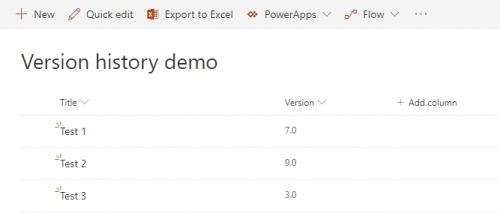
First of all, we need to have a SharePoint list with versioning enabled (obviously). I added some test items to make sure I would get a result in my PowerApps:
Setting up your basic app in PowerApps
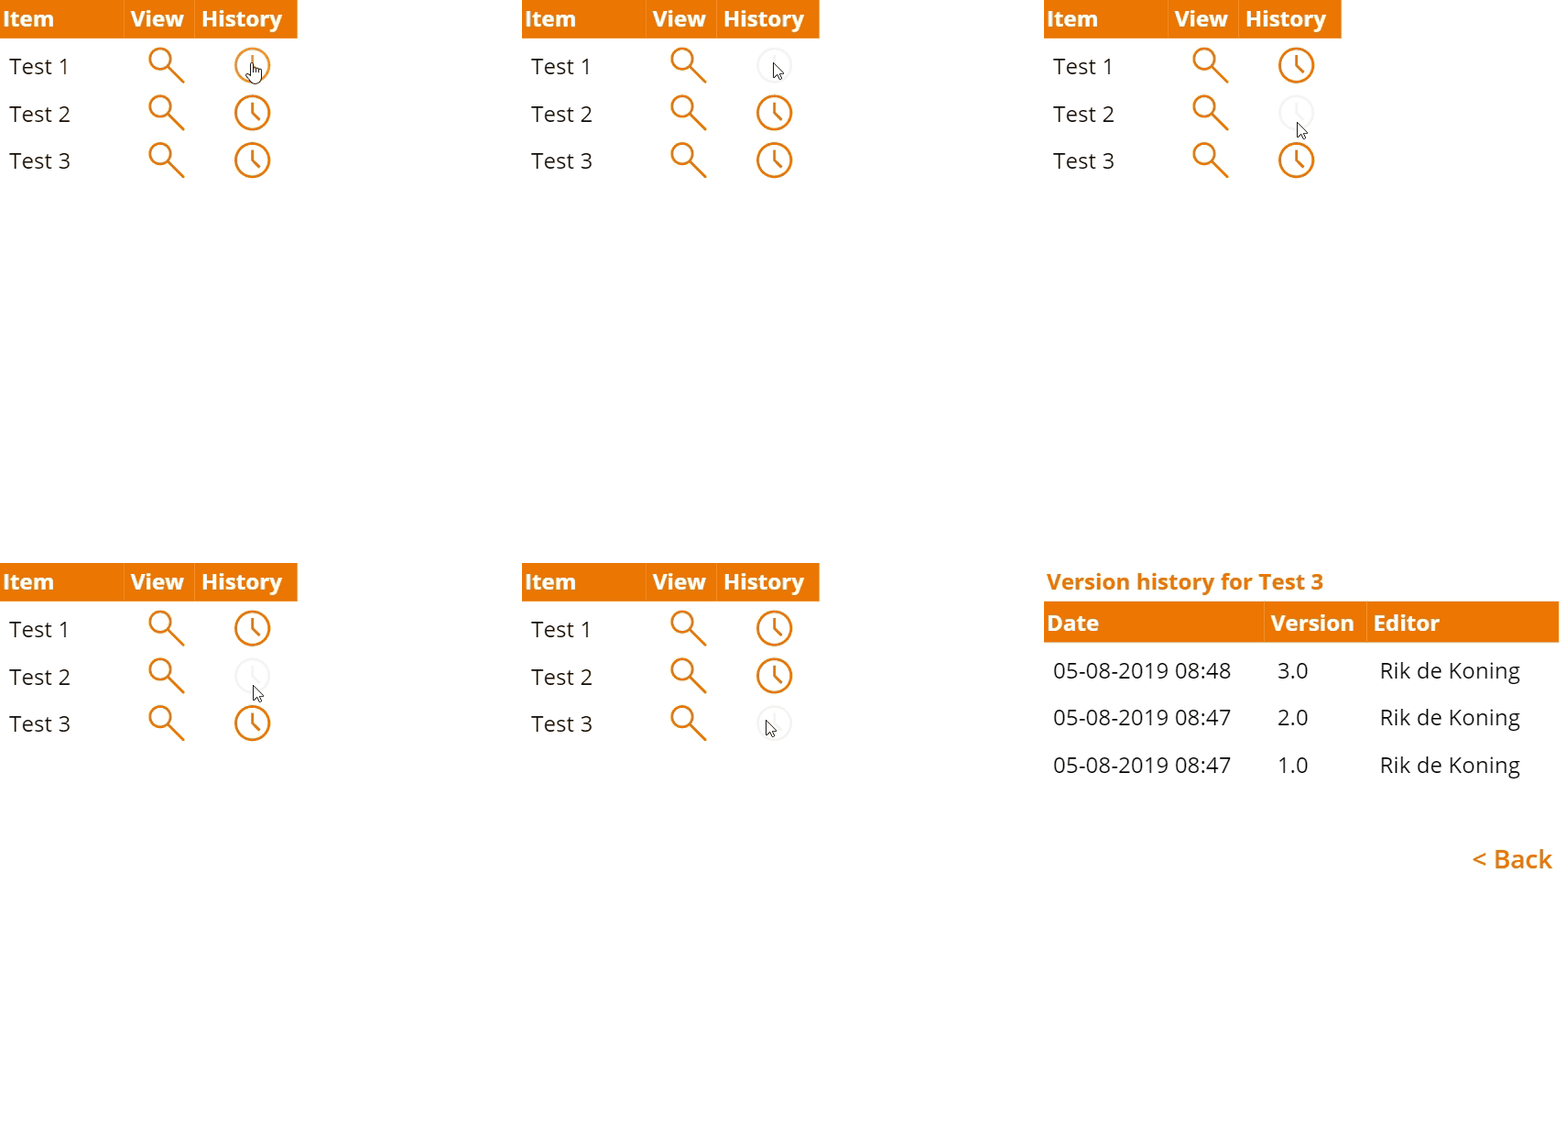
Next, we need to create a PowerApp that will show all SharePoint items and an option to retrieve the version history of a specific item. I used a gallery that shows the data from my SharePoint list for this:
Retieving the version history with Microsoft Flow
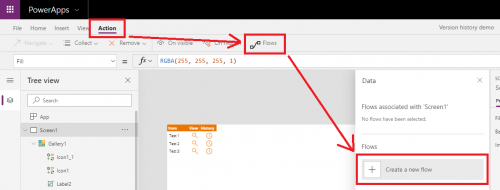
Now we need to make sure that clicking the history button will provide us with the version history of that specific item. To do this, we must create a Flow that is triggered from PowerApps by going to Action > Flows > Create a new flow.
You will get redirected to Flow where we get to configure our Flow.
Identify list item
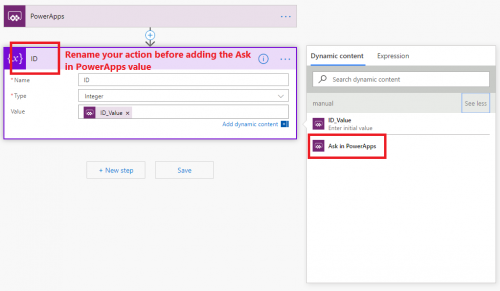
The first thing we need to do is to ask PowerApps to give us the list item ID. You can do this by adding a ‘Initialize variable‘ action, give the variable a name (e.g. ID) and selecting the ‘Ask in PowerApps‘ value from Dynamic Content.
PowerApps will show the name of your Flow action as a parameter, so I always rename these actions so that I can identify them easily. Make sure you rename the action before adding the ‘Ask in PowerApps’ value!
Version history storage
Next, we need to create an empty variable that stores the entire version history. Logical thought is that we must use an array variable, but since Microsoft Flow cannot pass array variables to PowerApps, we need to use a string variable which we transform back into a collection in PowerApps. More on this later.
Get version history
To get the version history of an item, we need to perform an API call to SharePoint. The endpoint for this is:
<TENANT>/sites/<SITE>/_api/web/lists/GetByTitle('<LISTNAME>')/items(<ID>)/VersionsYou can do this by adding the ‘Send an HTTP request to SharePoint‘ action and configuring it as follows:
Make sure to enter/select the correct Site Address and Listname in your Uri. The ID parameter can be selected from the Dynamic Content.
Process each version history item
This API call will return the entire version history to us. To process each version history item separately, we need to add and configure an ‘Apply to each‘ control. This isn’t as straight-forward as selecting the Body value from the Dynamic Content unfortunately. We need to manually enter the correct value from the Expressions tab:
body('Send_an_HTTP_request_to_SharePoint_to_get_version_history')['d']['results']
Please note that the Send_an_HTTP_request_to_SharePoint_to_get_version_history part of your expression may vary based on the name of your Send an HTTP request to SharePoint action:
Storing the version history
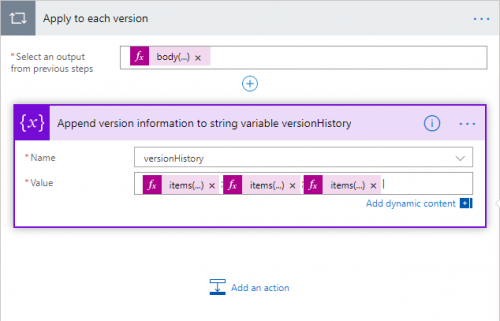
Inside our Apply to each action, we need to add an ‘Append to string variable‘ action that will write the output of each version history item to our versionHistory variable.
In my example, I wanted the following version history properties to show in my PowerApp:
- Date
- Version
- Editor (display name)
These three properties need to be put into the Append to string variable action, separated by semicolons so that we can split can later in our PowerApp. The values that you need are:
- Created
- VersionLabel
- Editor > LookupValue
This also isn’t as straight-forward as selecting the values from the Dynamic Content, so we need to work with the expressions tab again. In the correct order:
- items(‘Apply_to_each_version’)[‘Created’]
- items(‘Apply_to_each_version’)[‘VersionLabel’]
- items(‘Apply_to_each_version’)[‘Editor’][‘LookupValue’]
Where the Apply_to_each_version part of your expression may (again) vary, based on the name of your Apply to each control.
At the and of your string, put a pipe symbol (‘|’) so that we can divide each version history item from each other in our PowerApp later:
Passing the version history to PowerApps
Now that we’ve stored the entire version history into the versionHistory variable, we need to make sure this variable gets passed back to our PowerApp. You can do this by adding a ‘Respond to PowerApps‘ action, selecting the ‘Add an output‘ option and add a Text output that contains the versionHistory variable:
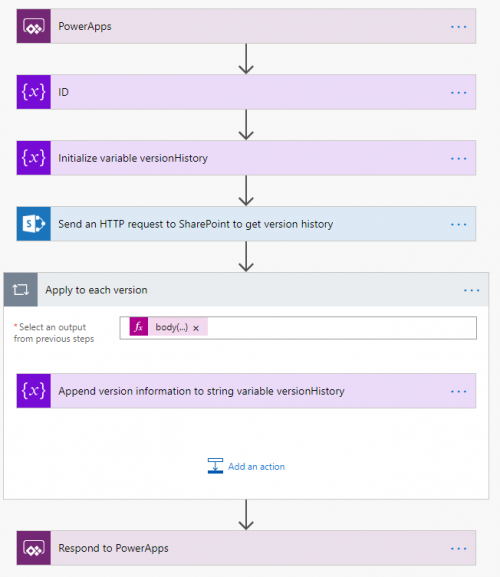
That’s it; your entire Flow should look like this now:
Transforming data in PowerApps
We now have a Flow that returns the entire version history in a single string, so we need to transform this into a collection so that we can use it in a gallery in our PowerApp.
The following actions are all performed when clicking the history button using the OnSelect() property:
Retrieve string from Microsoft Flow
First thing we need to do is to get the output from our Flow into a variable in PowerApps. You can do this by using the Set() function around your <FLOWNAME>.Run() action that runs your Flow. More on this can be found in my previous blog post.
| 1 2 3 4 | Set(v arHistory,Versionhistorydemo.Run(ThisItem.ID).history) |
Split version history items
Next, we need convert this string into a temporary collection by using the ClearCollect() function. In our Flow, we added a pipe separator to divide each version history item from each other so we can split on this character using the Split() function:
| 1 2 3 4 5 6 7 | ClearCollect(colHistoryTemp,Split(varHistory,"|")) |
Split version history item columns
After we’ve split the string into a temporary collection, we need to split it once more to divide the collection into columns. For this we need a combination of the ForAll(), Collect(), First(), Last(), FirstN() and Split() functions:
| 1 2 3 4 5 6 7 8 9 10 11 12 13 14 15 16 17 18 19 20 21 22 23 24 25 26 27 28 29 30 31 32 | ForAll(colHistoryTemp,Collect(colHistory,{Date: DateTimeValue(First(Split(Result,";").Result).Result,"nl-NL"),Version: Last(FirstN(Split(Result,";").Result,2).Result).Result,Editor: Last(Split(Result,";").Result).Result})) |
Dividing this into smaller pieces:
- ForAll() processes all items inside the colHistoryTemp collection
- Collect() fills the colHistory collection with the columns Date, Version and Editor and its corresponding values
- Each row of the colHistoryTemp collection will be split using the Split() function on the semicolon separator.
- According to the position of the value we need, we must use the First(), Last() of FirstN() function:
- Date is the first property that is stored in the row, so we can use the First() function here. Because the value is passed as a string, we need to convert it into a date value by using the DateTimeValue() function. “nl-NL” is the locale that is used to display the date value.
- Version is the second property that is stored in the row, so we need to get the first two properties by using the FirstN() function. By passing 2 as second parameter, we tell PowerApps we need the first two properties. From this result, we need the last property by using the Last() function.
- Editor is the last property that is stored in the row, so we can use the Last() function here.
Sorting version history
Now that we have our final collection filled and divided into columns, we can sort the collection on Date (or another property) by using the Sort() function:
| 1 2 3 4 5 | Sort(colHistory,Date,Descending) |
Cleaning up
After our final collection is complete, we can clear our temporary collection by using the Clear() function:
| 1 | Clear(colHistoryTemp) |
I’m also clearing both collections at the start of the OnSelect() event to avoid unwanted values.
Showing your version history
With the version history collection filled, we can now show the data in our PowerApp. I used a new screen with similar design to show the version history in a gallery, but you can also show the data on the same screen. It’s up to you!
Please note that the API call will take some time. To make it a bit more clear to the end-user what is happening and they’re not just staring to a screen where nothing happens, you can configure some kind of loading screen while the Flow is running. You can read about this in my previous blog post.
